18 October 2022
19 September 2022
Bring Back the Lever
Nikon's next retro camera should have a winding lever. Imagine a Zf that looks so much like an F3 that it even has the lever. The lever will serve no purpose, and will not be needed to operate the camera…unless you adjust custom setting CRM114, which controls how the winding lever works. You can set it to re-cock the shutter (even if the camera has no physical shutter). In essence, a lock that engages after every shot. Perhaps the lever could affect exposure compensation, or exposure lock. Pull the lever out partway to activate the spot meter, or take us back to the 1960s, and let the lever act as the on-off switch. No matter what, operating the lever should feel as much as possible like the F3's lever. In fact, I can see another custom setting: lever tension! At least three adjustments: no film loaded, thin base, and thick base.
Next on my list of necessary accessories is a battery pack that unlocks motor drive capability. With up to 30 frames per second of breakneck shooting speed, amateur photographers won't want to go without the ZD-4, which takes eight AA batteries (not included).
Finally, if you want to store a lot of images and not worry about a single point of failure, consider adding the ZF-4 to your shopping cart. This bulk memory card back bolts onto the Zf and has slots for 32 CFexpress cards, 16 on either side. Play it safe with 32 GB cards for 1 TB of storage, or record the ultimate real-time time lapse footage with 4 TB cards for 128 TB of storage (this much storage is needed for up to 30 minutes of footage using the newest high bit-rate, high bit-depth raw codec that requires a poorly written, slow plugin to transcode to something usable).
30 July 2022
Nikon FTZ Compatibility
Most F mount lenses will fit the FTZ and FTZ II adapters, although there are exceptions. The K rings are very tight, and I haven't attempted to force them on. Pre-AI lenses from prior to 1977 will generally fit, but the very oldest Nikkors may not mount.
 |
| Nikkor-S Auto 5cm f/2 (Pre-AI) with deep aperture ring |
Nikkors with deep or long aperture rings, which date to about 1959 and 1960, will almost mount on the FTZ adapters. The aperture ring bumps into the housing around the F mount on the adapter, with perhaps a millimeter of missing clearance. The aperture ring on the Nikkor-S 5cm f/2 is easy to fix, but not from a collector's standpoint. The threaded hole on the ring, seen above, takes a set screw that engages the diaphragm. With the screw removed, the aperture ring can be unscrewed with several turns and is ready for retooling.
“Retooling…I’ll retool you!”
Frank Shirley
 |
| Nikkor-S Auto 5cm f/2 (Pre-AI) with shortened aperture ring |
With the aperture ring removed, the lens is mountable on the FTZ. This is worth testing, just to make sure the bayonet pieces and any other protruding elements have space. A few minutes with a rotary tool or disc sander (the disc sander worked beautifully) will reduce the length of the aperture ring. With the aperture ring reattached, there are no issues mounting the lens to the FTZ adapter.
14 June 2022
Gardiner, Montana, from 2010
 |
| The Gardner River flows through Gardner Canyon, near Gardiner, Montana, July 2010. (Photo by Daniel Binkard) |
 |
| 45th Parallel sign along the Gardner River near Gardiner, Montana, July 2010. (Photo by Daniel Binkard) |
 |
| Roosevelt Arch in Gardiner, Montana, July 2010. (Photo by Daniel Binkard) |
 |
| Gardner River near Gardiner, Montana, July 2010. (Photo by Daniel Binkard) |
 |
| Gardner River near Gardiner, Montana, July 2010. (Photo by Daniel Binkard) |
 |
| Gardner River near Gardiner, Montana, July 2010. (Photo by Daniel Binkard) |
 |
| 45th Parallel sign along the Gardner River near Gardiner, Montana, July 2010. (Photo by Daniel Binkard) |
12 May 2022
Perspective
 |
| Martini glass, May 2013. (Photo by Daniel Binkard) |
 |
| Martini glass, May 2013. (Photo by Daniel Binkard) |
 |
| Martini glass, May 2013. (Photo by Daniel Binkard) |
08 May 2022
Processing Workflow in Lightroom Classic
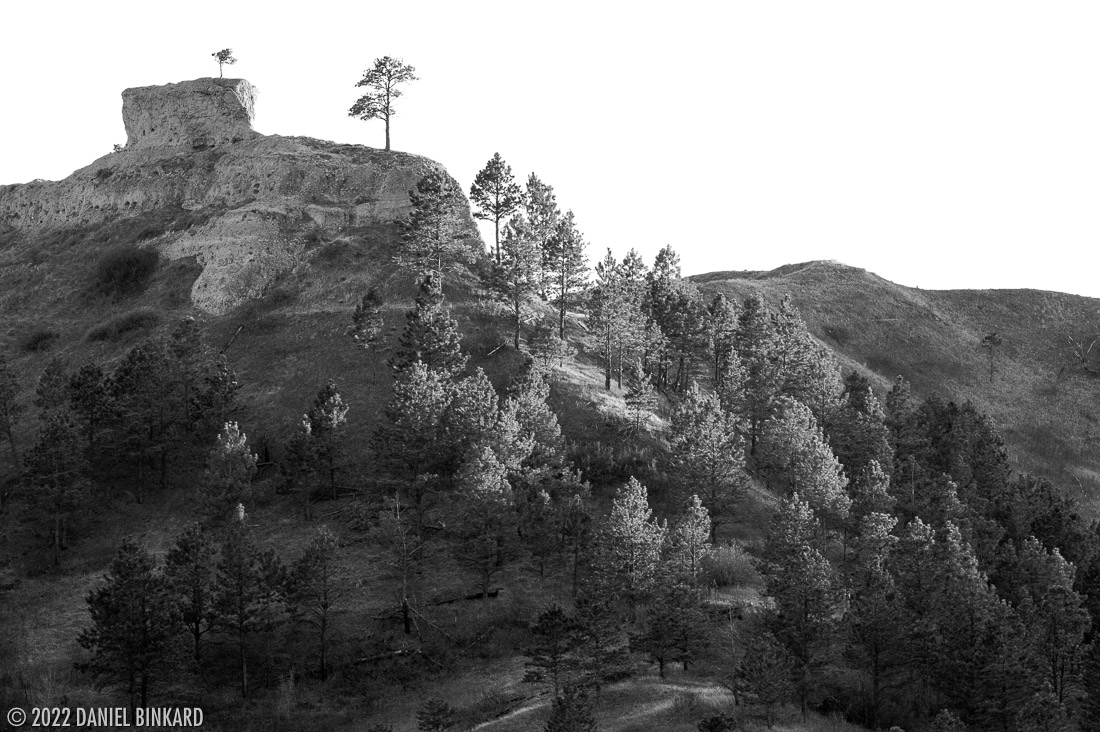
Here is an example of how I processed a photo in Adobe Lightroom Classic. In this example, I pull the saturation to zero and work on pure tonality, before finishing with color touches. I use a single mask with manual adjustments to work on the sky.
 |
| 1. Starting point, no adjustments beyond sharpening. |
 |
| 2. White balance from “as shot” to “cloudy.” |
 |
| 3. Saturation to zero. |
 |
| 4. Exposure adjustment for overall brightness. (Brightness added.) |
 |
| 5. Overall contrast adjustment. (Contrast added.) |
 |
| 6. Highlight adjustment. Because the sky is so bright and lacks detail, I am paying particular attention to how the lit trees are affected. (Brightness added.) |
 |
| 7. Shadow adjustment. (Shadows darkened.) |
 |
| 8. White (extreme highlights) adjustment. Again, paying attention to how the trees and ridge are affected and letting the sky get too bright. (Brightness added.) |
 |
| 9. Black (extreme shadows) adjustment. (Shadows darkened.) |
 |
| 10. Clarity (local contrast) adjustment. (Slight increase.) |
 |
| 11. Saturation reset to see what overall scene looks like in color. |
 |
| 12. Sky selected with automatic mask and fine tuned with brush, then darkened with a combination of exposure, highlights, and whites. |
 |
| 13. Saturation and vibrance increased for final effect. Evening light on Steamboat Butte at Chadron State Park, May 2022. (Photo by Daniel Binkard) |
07 May 2022
Nikon 1 Flat Field Correction
The Nikon 1 lenses generally provide good sharpness, and the entire system is lightweight and responsive. For hikes where I expect to be off trail, or if I'm looking for exercise more than careful shooting, a lightweight camera and one or two small lenses are helpful.
The 1 Nikkor 30-110mm telephoto zoom lens is the system's equivalent to the 135 format 70-300mm. I find the AF-P 70-300mm Nikkor to have its own issue at 300 mm — vignetting, to the point where I try to shoot with an APS-C crop to avoid the edges. All that is to say that the 30-110 mimics its larger sibling, here with asymmetrical vignetting that results in color casts on the left and right edges.
I use Adobe Lightroom Classic to eliminate this problem. The process involves taking a blank reference frame at the same focal length, aperture, sensitivity, and preferably focus distance. The reference frame will contain the same vignette, which is essentially subtracted from the object frame.
 |
| Object frame, no adjustments. 1 Nikkor 30-110mm, 83.2 mm, f/5.6. |
 |
| Object frame with tonal and color adjustments to taste. Note magenta color shift in sky on right side. |
 |
| Object frame with tonal and color adjustments to taste, plus flat field correction. Windmill in the Nebraska National Forest, May 2022. (Photo by Daniel Binkard) |
 |
| Reference frame, no adjustments. 1 Nikkor 30-110mm, 83.2 mm, f/6.3. |
 |
| Reference frame, contrast increased to show color shift. |
As you can see, the color shift has been largely eliminated, certainly enough to cover my needs for this photo. Even with the reference frame shot at a different aperture and focus distance, the correction works nicely.
In Lightroom, this tool generates a DNG and removes the original raw file from the catalog, which I find annoying. I synchronize the containing folder to bring the raw file back into the catalog, and group it with the DNG. Adobe includes an option to simply delete the raw file, but I certainly don't recommend doing that.
I prepared a number of reference frames by photographing through an ExpoDisc diffuser with a neutral LED shining into the lens. I zoomed the lens in the smallest increments I could manage to create a reference for each focal length (note the 83.2 mm focal length above, based on the EXIF data for the photos). The reference photos should not be over- or underexposed.
As with other techniques for removing tonal vignetting, the results will be noisier in the areas that were brightened, and the color correction may create additional issues, particularly if you are making massive creative tone and color shifts.